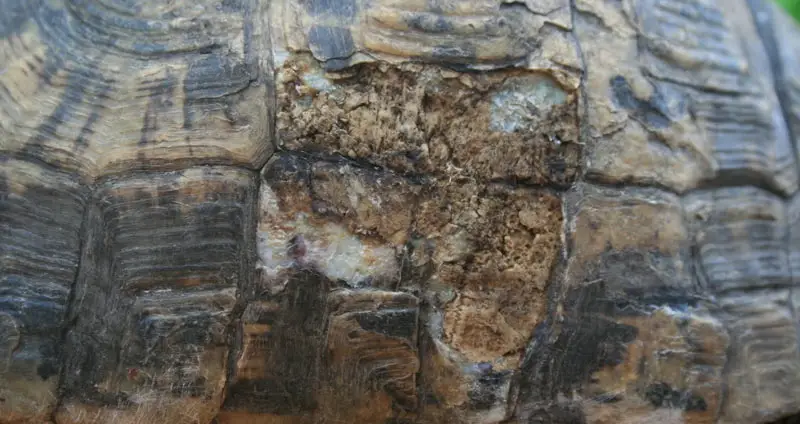
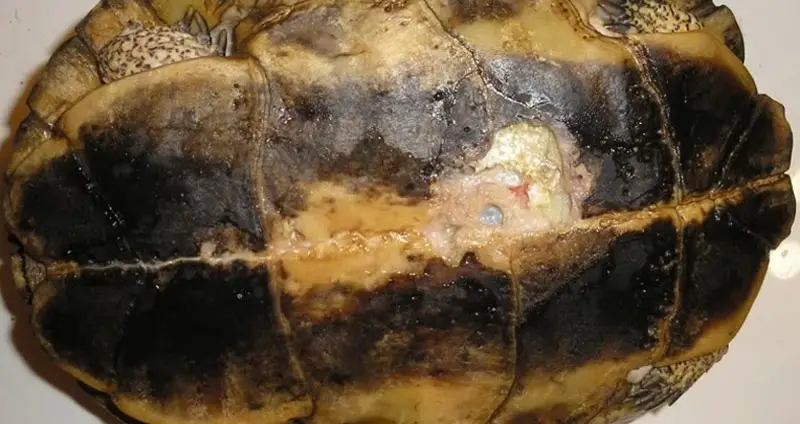
Shell rot in turtles isn’t a singular, simple disease that they develop. Instead, it’s a term that encompasses many different issues that can occur with a turtle’s shell. Despite this, all symptoms are relatively similar, and preventative/recovery procedures are all quite similar. All turtle keepers will agree that it’s a problem that should be acknowledged and looked out for. So, this post will cover the causes of shell rot, what it looks like, and how you can get rid of shell rot in your turtles.
Table of Contents
What Causes Turtle Shell Rot?
Shell rot can occur quite quickly and come about under only mild circumstances. It begins with a turtle’s shell becoming damaged. This can happen in a variety of different ways, such as through simple scratches, cracks, or punctures. Once the shell is breached, it allows bacteria, fungus, and algae to enter the shell and start to spread, causing an infection that will literally rot away the turtle’s shell. If left untreated, this infection can work its way into a turtle’s body cavity, which can be fatal. It can also be passed from one sick turtle to another if they’re housed together.
Unsafe Environments Are Prominent Causes
A very common cause for shell rot is an unsafe environment that the turtle’s being kept in. If a turtle tank has rough surfaces or sharp corners, these may potentially damage a turtle’s shell and allow shell rot to move in. The climate itself may be a factor, too. All chelonians must be kept in an environment with a steady, appropriate humidity.
If a semi-aquatic turtle doesn’t have adequate heating or basking areas, their shells can become soft and the plates may lift up to allow bacteria inside. The same goes for terrestrial turtles in too damp of an environment. Alternately, if a tank is too dry, it can result in a turtle’s shell cracking and flaking.
Aggressive Turtles In Communal Enclosures
Often times if two or more turtles are kept together and one is slightly aggressive, shell tends to occur. This is because scuffles between turtles can cause injuries to not only the shells, but their entire bodies, too. If you notice that one turtle is more aggressive, it’s recommended that they’re separated from the others and kept in their own enclosure. Even a simple scratch is sometimes enough to cause shell rot.

Symptoms Of Shell Rot
Fortunately, the symptoms of shell rot are quite easy to spot and can be apparent quite early on into the infection. It’s very important to keep an eye out for these early warning signs as they can help you treat the shell rot before it becomes worse or spreads to other turtles.
The most common symptoms generally start off with visible damage to the shell. It will look uneven, some plates may lift up slightly, and there’s sometimes foul-smelling discharge underneath the shell. There will also be some pitting present in the shell, with some pieces falling off when the rot gets really bad. Essentially, if the shell starts to get this bad, you should take your turtle to a specialist veterinarian immediately.
However, there are some symptoms of shell rot that are quite minor, and these are visible right at the beginning of the infection. At this point, most turtles will respond well to home remedies and may fully recover if treated properly and promptly. Some of those “treatable” symptoms are as follows:
- Only a few small, shallow areas showing signs of infection
- Dry lesions with no draining pus or soft spots present
- Typically a white, dry, crusty substance within the lesions that look like part of the shell
- The turtle shows no signs of illness in their behavior or eating habits
Turtle Shell Rot Cure
If you’re able to identify shell rot in your turtle when its in the early stages of development, you should be able to apply home remedies to help cure it. The method highlighted below is quite effective and has been utilized by many turtle owners. However, if you see that your turtle hasn’t improved for a week after this treatment, then you should take them to a specialist.
- 1Gather necessary materialsThere are a few supplies that you’ll use to cure your turtle’s shell rot. First of all, you’ll need a mild soap that will be used to clean your turtle’s shell. Make sure not to get this soap on their skin. Secondly, a fine-bristled toothbrush will be utilized to lightly scrub the shell. You will also need something that will kill the bacteria and fungus present in your turtle’s shell, and Betadine tends to be a favorite antiseptic among pet owners. Finally, paper towels and rubber gloves will be necessary throughout the entire cleaning process.
- 2Observe your turtle for woundsBefore you begin treatment, you first need to identify every instance of shell rot on your turtle. These areas will generally be rougher and discolored, but shouldn’t be too severe if you’re pursuing home treatment. Take a mental note of all of these spots so that you treat every instance.
- 3Clean the surface of the shellThe entire shell will need to be cleaned to remove any excess dirt and debris and to also make for as sanitary of a surface as possible. Using your soft toothbrush and the mild soap, brush the shell to remove all dirt, algae, and broken shell pieces if necessary. Peel off any bits of shell if they can be peeled off, as you need to reach the base of the rot to eliminate it.Many turtles with shell rot have white pits on their shells, and these will need to be scraped off while dry with a clean plastic utensil. If extensive cleaning is necessary, then this process should be done by a specialist with the turtle under anesthesia. Dry the shell thoroughly once you’re done.
- 4Begin the disinfecting of the shell rotOriginally hydrogen peroxide was used to treat shell rot, but this actually resulted in the healing process getting slowed down significantly. Betadine, or a 10% Povidone Iodine solution, is now used and yield great results. Once you’ve scraped away the rotted shell to get to the tissue beneath it, apply the Betadine to the shell rot. Use the toothbrush to make sure that every crack and crevice is covered with the solution. This will ensure that all of the bacteria and fungus is killed so that it doesn’t come back later.Reapply the solution once every 10 minutes for 30 minutes. After the third application, let the turtle sit in a dry enclosure for at least half an hour to an hour. This enclosure should have no water, and the presence of a heat lamp will help to speed up the process. The turtle can be transferred to their normal enclosure after the “curing” process is over.Continue this process for a week. In many cases, this treatment will entirely clear up the shell rot. If the shell is still in bad shape after the week of treatment, take your turtle to a specialist immediately.

Preventing Shell Rot In Turtles
While the aforementioned cure works phenomenally, the best cure for shell rot in turtles is excellent preventative measures. It’s not a difficult task to keep a turtle’s shell rot-free. It simply takes a bit of diligence and care by the owner — something that most owners have plenty of for their beloved turtles.
Keeping the habitat clean and safe is the best way to prevent shell rot. If nothing is damaging your turtle’s shell, there’s no way that they can develop this problem. Make sure that the enclosure is free of any materials or structures that could scratch or puncture a turtle’s shell. Keep the temperature and humidity of the tank at optimal levels for your specific species of turtle to prevent cracking or softening. Water should also be cleaned regularly with a very reliable filter so that it’s entirely free of algae.
If you opt to house two or more turtles together, you absolutely must keep an eye on them when they’re first introduced to each other. If turtles get into a fight, shells can easily become damaged and quickly experience shell rot. To err on the side of caution, either supply a very sizable tank for your turtles or keep them in separate tanks altogether.
Is Shell Rot A Serious Condition?
Untreated shell rot is absolutely a serious condition. However, if it’s caught early and promptly treated, then it really isn’t serious at all. Minor shell rot is something that happens in both captive and wild turtles, so it isn’t an extremely uncommon occurrence. When shell rot is treated properly, there shouldn’t be any lingering or underlying health effects on the turtle.
If shell rot goes untreated, though, it can become very problematic. Once the rot penetrates deeper than the shell itself, serious health issues emerge. At this point, the bacteria and fungus can form abscesses that take years of treatment to recover from if its recoverable at all.
Turtles can also develop something called SCUD, which is a septic infection arising from the shell rot. This condition is extremely serious, often resulting in death. So, in conclusion, if you notice that your turtle’s shell is exhibiting signs of shell rot, don’t delay in beginning treatment. These creatures live for an extremely long time, so it’s a serious shame to lose such an animal to a treatable condition such as this.

